
如果你要折騰主題或者將WordPress站點開放注冊,你可能需要自定義WordPress用戶個人資料信息。下面倡萌將簡單說一下如何刪除、添加和調用自定義用戶信息字段。
來源于:
https://www.wpdaxue.com/add-remove-display-wordpress-user-profile-fields.html
/**
 * 自定義用戶個人資料信息
 * https://www.wpdaxue.com/add-remove-display-wordpress-user-profile-fields.html
 */
add_filter( 'user_contactmethods', 'wpdaxue_add_contact_fields' );
function wpdaxue_add_contact_fields( $contactmethods ) {
	$contactmethods['qq'] = 'QQ';
	$contactmethods['qm_mailme'] = 'QQ郵箱“郵我”';
	$contactmethods['qq_weibo'] = '騰訊微博';
	$contactmethods['sina_weibo'] = '新浪微博';
	$contactmethods['twitter'] = 'Twitter';
	$contactmethods['google_plus'] = 'Google+';
	$contactmethods['donate'] = '贊助鏈接';
	unset( $contactmethods['yim'] );
	unset( $contactmethods['aim'] );
	unset( $contactmethods['jabber'] );
	return $contactmethods;
}
以上代碼通過?user_contactmethods?這個鉤子添加了QQ等多個自定義字段,同時移除了 yim、aim和jabber,用法一目了然,就不多說,效果如下圖所示:

如果要調用上面的字段,只需要使用 the_author_meta() 或 get_the_author_meta() 這兩個函數即可。
the_author_meta() 直接打印輸出字段值
get_the_author_meta() 返回字段值給其他函數調用
注:一般而言,WordPress大多數函數都有類似這兩種,一個帶 get_ 前綴,一個沒有,兩者用法的區別如上所說。
比如我們要調用QQ字段,可以使用使用下面的代碼:
<?php
//打印輸出QQ字段的值
the_author_meta( 'qq' );
//或者下面的
echo get_the_author_meta( 'qq' );
?>
我們在實際使用的時候,最好先通過 IF 語句判斷用戶是否填寫了 QQ 這個字段(即判斷QQ字段是否存在值),如果填寫了,就輸出,否者不輸出
<?php if ( get_the_author_meta( 'qq' ) ){
	echo '作者QQ:'.get_the_author_meta( 'qq' );
}
關于調用更多默認的字段,建議大家自己參考?the_author_meta()?和?get_the_author_meta()
注:在沒有指定用戶ID等明確信息時,以上兩個函數只能在循環(Loop)內才能正常使用。
WordPress 個人資料添加額外的字段
來源于:
https://www.wpdaxue.com/extra-user-profile-fields.html
在以上的方法中,我們可以非常方便地自定義“聯系信息”表單,但是那個方法有些弊端:
只能新增到“聯系信息”那里,不能添加自定義的描述文字(提示文本),只能是 input 表單。
今天分享的方法就可以彌補這幾個弊端,可以將字段添加到所有資料的最下面,支持添加描述文字,可以使用 input、textarea、select 等多種表單(前提是你會用)。
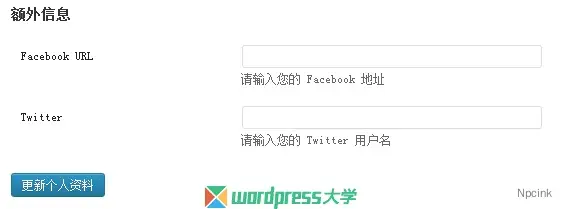
下面是一個簡單的樣例,添加標題和兩個 input 表單。
在主題的 functions.php 里添加下面的代碼:
/**
 * WordPress 個人資料添加額外的字段
 * https://www.wpdaxue.com/extra-user-profile-fields.html
 */
add_action( 'show_user_profile', 'extra_user_profile_fields' );
add_action( 'edit_user_profile', 'extra_user_profile_fields' );
?
function extra_user_profile_fields( $user ) { ?>
<h3><?php _e("額外信息", "blank"); ?></h3>
?
<table class="form-table">
	<tr>
		<th><label for="facebook"><?php _e("Facebook URL"); ?></label></th>
		<td>
			<input type="text" name="facebook" id="facebook" value="<?php echo esc_attr( get_the_author_meta( 'facebook', $user->ID ) ); ?>" class="regular-text" /><br />
			<span class="description"><?php _e("請輸入您的 Facebook 地址"); ?></span>
		</td>
	</tr>
	<tr>
		<th><label for="twitter"><?php _e("Twitter"); ?></label></th>
		<td>
			<input type="text" name="twitter" id="twitter" value="<?php echo esc_attr( get_the_author_meta( 'twitter', $user->ID ) ); ?>" class="regular-text" /><br />
			<span class="description"><?php _e("請輸入您的 Twitter 用戶名"); ?></span>
		</td>
	</tr>
</table>
<?php }
?
add_action( 'personal_options_update', 'save_extra_user_profile_fields' );
add_action( 'edit_user_profile_update', 'save_extra_user_profile_fields' );
?
function save_extra_user_profile_fields( $user_id ) {
?
	if ( !current_user_can( 'edit_user', $user_id ) ) { return false; }
?
	update_usermeta( $user_id, 'facebook', $_POST['facebook'] );
	update_usermeta( $user_id, 'twitter', $_POST['twitter'] );
}
代碼中使用了 show_user_profile 和 edit_user_profile 這兩個鉤子將表單掛載到個人資料頁面,然后使用 ‘personal_options_update’ 和 ‘edit_user_profile_update’ 這兩個鉤子掛載新添加的字段到更新操作,其中使用 update_usermeta() 這個函數來更新字段信息。
如果你是開發者,相信你自己可以添加其他的表單類型,倡萌就不獻丑了。
